JGuru
When you need a guru
  • Home
  • About
  • Services
  • Blog
  • Projects
    • Liferay Backup
    • Photo Carousel Portlet
    • Social Comments Portlet
    • Liferay Yubikey OTP Login
  • Contact
cyber_security
October 7 2017

How to get Tomcat to see HTTPS when it’s terminated elsewhere

Mika Koivisto Howto https, nginx, tomcat 0

It’s very common to terminate HTTPS (TLS) at higher up in your server stack but you still need your webapp running in tomcat to generate the urls using https even though tomcat is called with http internally in your network. This seems to be a very common problem that I keep seeing year after year so this short article will show you how to accomplish that and how to test it’s working.

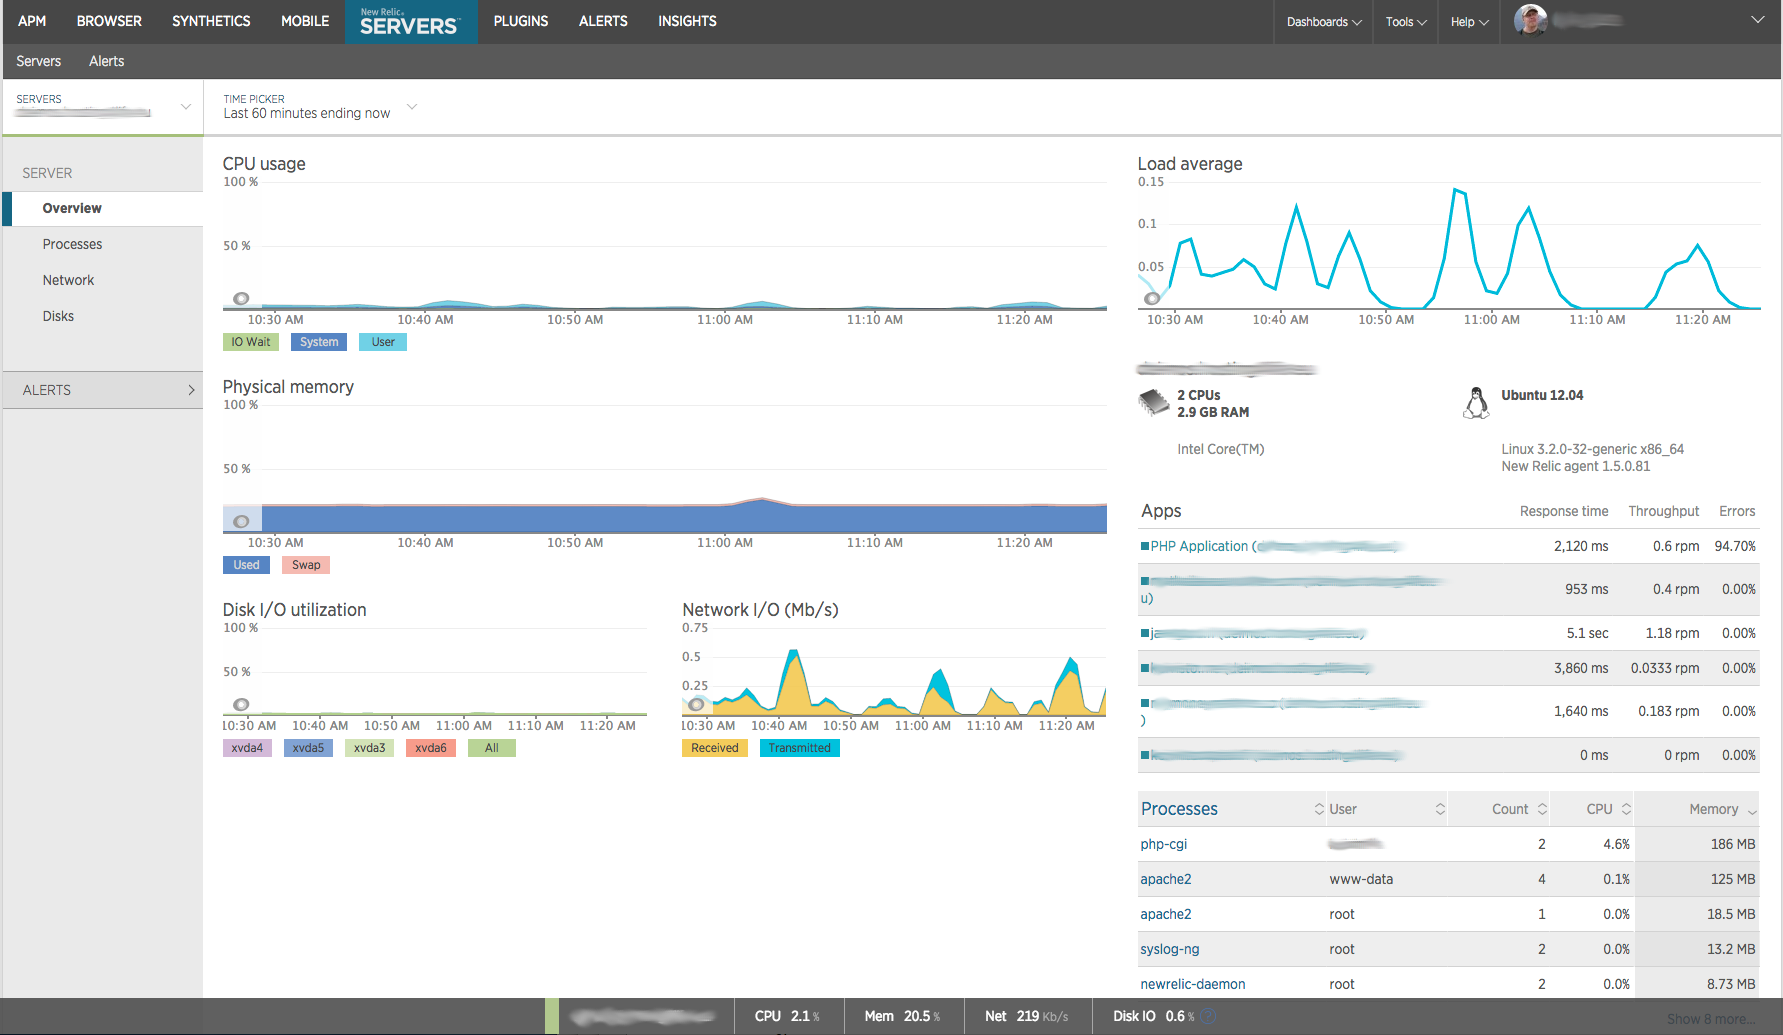
In this diagram https is terminated at firewall but that could as well be loadbalancer or even http server like Nginx or Apache. For the test setup I’m actually using Nginx and for instructions on how to setup HTTPS with Nginx check out my post on setting up Nginx with Let’s Encrypt. Once you’ve setup https with Nginx add following location block to the server block with HTTPS. This will proxy all requests to tomcat http port 8080.

location ~ / {
      proxy_set_header   Host             $host;
      proxy_set_header   X-Real-IP        $remote_addr;
      proxy_set_header   X-Forwarded-For  $proxy_add_x_forwarded_for;
      proxy_set_header   REMOTE_ADDR      $remote_addr;

      proxy_pass         http://localhost:8080;
}

Tomcat is actually really easy to configure so that it is able to generate URLs with https when the https is terminated somewhere higher in the stack. All you need is to add proxyPort, scheme, and secure to the connector in server.xml. Below is an example. If you are using both http and https then just create a new connector for https traffic that is running in different port and proxy only the https traffic to that port.

<Connector port="8080" protocol="HTTP/1.1"
      connectionTimeout="20000"
      redirectPort="8443" 
      proxyPort="443"
      scheme="https"
      secure="true" />

Now to check that it is actually working correctly you need to check your servlet container is seeing those values correctly. For that purpose I’ve created a simple webapp which you can deploy and call through your stack. It shows if each of the three checks pass and additionally shows the request URL and server name so you can also check that any virtual hosts you use are also passed correctly to the servlet container.

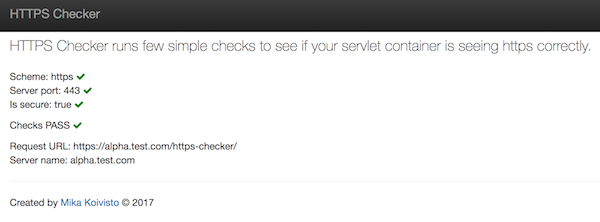
Download HTTPS Checker webapp. See the source in Github.

fail
February 28 2017

Top 3 reasons why Liferay projects fail

Mika Koivisto Liferay liferay 0

I’ve been using Liferay for well over ten years and I’ve seen lots of different ways Liferay projects have been done. There’s been successful projects and then there’s been failed ones. You typically don’t hear about the successful projects but rather the failures but you hardly ever hear why the project failed other than of course that it’s Liferay’s fault. So I wanted to list few of the top reasons in my experience why they fail so that you can avoid them and have higher change of success. These are not really listed in any order of priority but are rather equally important. More

FIDO-Yubico-YubiKeys-2-444x296
January 30 2017

Liferay Yubikey OTP Login

Mika Koivisto Liferay fido u2f, liferay, yubico, yubikey 0

I bought a Yubikey 4 last fall but didn’t have time to play with it until now. Yubikey is awesome and quite cheap USB authentication key. It also support FIDO U2F in addition to one-time-password. So far I’ve enabled on my Facebook account as well as MacOS Sierra login.  I also wanted to write some code and integrate it with Liferay. As a result I’ve implemented a simple Yubikey OTP login. More

nginx
July 7 2016

Creating a custom Nginx build for Ubuntu/Debian

Mika Koivisto Howto debian, nginx, ngx_cache_purge, pagespeed, ubuntu 1

I’ve been using the RTCamp Ubuntu package for Nginx because it had ngx_cache_purge and ngx_pagespeed modules builtin. The problem with is that it’s still stuck on Nginx 1.8 version which doesn’t support HTTP/2 so I had to figure out how to do my own build based on the latest Nginx mainline version. More

getting-git-right
June 11 2016

Moving a project from one git repository to another while retaining it’s history

Mika Koivisto Howto git, repository 0

I recently had to move a project from one git repository to another existing repository under different source tree and I wanted to retain the history of each file. This is rather easy once you know how to do it but you can easily jack up things if you don’t know. So I wanted to write clear instructions for the next time I have to do this and hopefully it also helps someone else. More

cyber_security
May 29 2016

Setting up https with Let’s Encrypt on Nginx

Mika Koivisto Howto certificate, https, nginx, security, ssl, tls 1

Let’s Encrypt is an awesome free, automated and open way of protecting your site with https. As you may have noticed this site is using Let’s Encrypt certificate and I’ve started rolling it out to all my other sites too. With free https certificate there’s really no excuse not to use https only. In fact if you want to take advantage of HTTP/2 you’ll need https since no one currently supports it unencrypted even though the spec doesn’t mandate it. More

August 28 2015

Monitoring Apache HTTPd with New Relic

Mika Koivisto Howto apache, httpd, monitoring, newrelic 0

When figuring out what’s wrong with a sites performance it’s important to get facts about every aspect and component involved with that site. Apache is quite often used in front of java applications and it’s the app server for php applications. Bad apache configuration can make a site seem sluggish even when there are plenty of other resources available so it’s important to see what’s going on here. From the first screen of Apache HTTPd plugin you’ll get a nice overview of all your monitored apaches. More

April 29 2015

Monitoring Nginx with New Relic

Mika Koivisto Howto httpd, monitoring, newrelic, nginx

Apache HTTPd has always been my goto httpd, reverse proxy and load balancer but lately I’ve grown more interested in Nginx. It’s very high performance and lightweight not to mention easy to configure. Of course with my currently a single Nginx I wanted to see how could I hook it up my monitoring. Turns our there’s a New Relic agent directly from Nginx. More

April 27 2015

Monitoring MariaDB / MySQL with New Relic

Mika Koivisto Howto mariadb, monitoring, mysql, newrelic

In order to size your system correctly you need metrics and you need those also from your database. Not only is it important to know what’s happening in your database for capacity planning it’s also invaluable information when something goes wrong. If you have a database related performance problem in your code seeing how the fix effects the database can help you see if you actually solved the problem. Also looking at database statistics you might be able to spot a issue before it becomes a serious problem.

New Relic has a wonderful plugin framework and there’s a ton of ready made plugins and also SDK and API for things it doesn’t already support. MySQL plugin is one of those ready made plugins and it provides all the key information you’ll need. The MySQL plugin page quickly shows what’s going on all monitored databases.
New Relic Plugins MySQL

When you drill down to a individual database server the overview shows the SQL volume and how it’s split between reads and writes. More key metrics are displayed under Key Utilizations. You’ll also find database connections and network traffic on this page.

New Relic Plugins MySQL Overview

Going further down to Query analysis you’ll see in more details about the queries.

New Relic Plugins MySQL Query Analysis

If you are using InnoDB there’s a separate page to show key metrics from InnoDB.

New Relic Plugins MySQL InnoDB Metrics

Installing MySQL / MariaDB Monitoring

1) MySQL plugin can easily be installed with New Relic platform installer. So the first thing you need to do is install the platform installer. You’ll need your New Relic license key which you can find from account settings on rpm.newrelic.com. Once you have that you can install it with following one liner which is for 64bit Debian and Ubuntu.

LICENSE_KEY=YOUR_LICENSE_KEY bash -c "$(curl -sSL https://download.newrelic.com/npi/release/install-npi-linux-debian-x64.sh)"

2) Next go to the newly created newrelic-npi directory and run install. You’ll want to answer yes to all the questions and when prompted to configure the plugin grab the configuration from the next step.

./npi install nrmysql

3) If you skipped configuration you can configure the plugin afterward too. You can find the configuration file under newrelic-npi from plugins/com.newrelic.plugins.mysql.instance/newrelic_mysql_plugin-2.0.0/config/plugin.json. Below is a sample configuration for MariaDB (works for MySQL) running on localhost and we’ll be creating a separate user newrelic with password somepassword which the plugin will use to gather data. You can connect to multiple databases with the same agent. I usually install this agent on the same server my nagios is running on.

{
 "agents": [
   {
     "name" : "MariaDB on localhost",
     "host" : "localhost",
     "metrics" : "status,newrelic,buffer_pool_stats,innodb_status,innodb_mutex",
     "user" : "newrelic",
     "passwd" : "somepassword"
   }
 ]
}

4) Now we need to create a user in the database and grant some rights to it.

cat - <<EOF | mysql -u root -p
CREATE USER [email protected]'%' IDENTIFIED BY 'somepassword';
GRANT PROCESS,REPLICATION CLIENT ON *.* TO [email protected]'%';
EOF

5) Last thing is to start the service but before we do make sure you have Java installed as this agent is written in Java. If you don’t have Java installed check my unattended Java install script. Otherwise you can proceed to start the service that should have been created during npi install if you answered all the questions correctly.

service newrelic_plugin_com.newrelic.plugins.mysql.instance start

Now it may take few minutes before you see your server under Plugins MySQL in rpm.newrelic.com. If it doesn’t check the log under plugins/com.newrelic.plugins.mysql.instance/newrelic_mysql_plugin-2.0.0/logs/ for hints and make sure the agent actually started.

April 24 2015

Monitoring Ubuntu / Debian Server with New Relic

Mika Koivisto Howto debian, monitoring, newrelic, ubuntu

With New Relic Server Monitoring you’ll see all the important information about your system with just one glance. This is a essential tool for troubleshooting performance issues and also seeing that your system is properly sized. Sometimes poor application performance has nothing to do with the application but rather the system it’s running. If the system is not correctly sized you might be running out of memory, cpu or the bottle neck could be disk io. Without proper monitoring it is very hard to pinpoint the cause.

The servers listing gives a nice overview of all servers and you an easily see if there’s any issues.

New Relic Servers
New Relic Servers

When looking at a specific server you’ll see a history of it’s CPU and memory usage as well as load average and network I/O. If you have any APM enabled applications installed you’ll see a overview of their response times, throughput and error rate. You’ll also see some of the top processes running on the server.

New Relic Servers Overview
New Relic Server Overview

When you drill down to processes listing you’ll quickly see the top memory and cpu consumers. You can also look at the history of individual processes.

New Relic Server Processes

Installing New Relic Server Monitoring on a Ubuntu / Debian Server

1) Add an apt source for New Relic.

cat - <<-EOF >> /etc/apt/sources.list.d/newrelic.list 
# newrelic repository list 
deb http://apt.newrelic.com/debian/ newrelic non-free
EOF

2) You’ll need to get the key for New Relic repository and then update apt sources. After that you can install newrelic-sysmond.

apt-key adv --recv-keys --keyserver keyserver.ubuntu.com 0xB31B29E5548C16BF
apt-get update
apt-get install newrelic-sysmond

3) Next you’ll need to tell it your license key so that it reports the data to your account. You can find your license key from your account settings page on rpm.newrelic.com. You can either edit the configuration file or you can set the license like shown below:

/usr/sbin/nrsysmond-config --set license_key=YOUR_LICENSE_KEY

4) Finally once everything is configured you can start the system monitor daemon.

service newrelic-sysmond start

Now in few minutes you should start seeing your server listed under Servers on rpm.newrelic.com

1 2 3 4

Tags

activemq apache backup c3p0 certificate connection pool debian debugging deployment git heap hook httpd https installer java jms jmx jmx4perl jndi jolokia jvm liferay mariadb maven memory monitoring mrtg mysql nagios newrelic nginx ngx_cache_purge pagespeed performance repository salesforce saml security spring ssl struts tls tomcat ubuntu

Categories

  • General
  • Howto
  • Liferay

Recent Posts

  • cyber_securityHow to get Tomcat to see HTTPS when it’s terminated elsewhere
  • failTop 3 reasons why Liferay projects fail
  • FIDO-Yubico-YubiKeys-2-444x296Liferay Yubikey OTP Login
  • nginxCreating a custom Nginx build for Ubuntu/Debian
  • getting-git-rightMoving a project from one git repository to another while retaining it’s history

Archives

  • October 2017
  • February 2017
  • January 2017
  • July 2016
  • June 2016
  • May 2016
  • August 2015
  • April 2015
  • January 2015
  • October 2013
  • June 2013
  • August 2012
  • July 2012
  • June 2012
  • May 2012
  • March 2012
  • February 2012
  • January 2012
  • January 2011
  • September 2010
  • August 2010
  • December 2009
  • October 2008
  • December 2007

Recent Posts

  • cyber_securityHow to get Tomcat to see HTTPS when it’s terminated elsewhere
  • failTop 3 reasons why Liferay projects fail
  • FIDO-Yubico-YubiKeys-2-444x296Liferay Yubikey OTP Login
  • nginxCreating a custom Nginx build for Ubuntu/Debian
  • getting-git-rightMoving a project from one git repository to another while retaining it’s history

Follow me on Twitter

My Tweets
© JGuru 2006 - 2017