JGuru
When you need a guru
  • Home
  • About
  • Services
  • Blog
  • Projects
    • Liferay Backup
    • Photo Carousel Portlet
    • Social Comments Portlet
    • Liferay Yubikey OTP Login
  • Contact
April 23 2015

Monitoring with New Relic

Mika Koivisto General monitoring, newrelic, performance

New Relic is a wonderful software analytics suite that is 100% SaaS. I love it because it’s so easy to setup compared to Nagios, MRTG and other on premise software. Also their Lite edition is free with 24 hour data retention and for 30 days you’ll get to see the power of the Pro version. I still use nagios for my main monitoring and create some key graphs with MRTG but the data junkie in me loves all the data New Relic gathers and shows in nice graphs.

New Relic has seven parts or products as they call them. Those are APM, Insights, Mobile, Browser, Synthetics, Servers and Plugins. I have myself used only APM, Browser, Server and Plugins which are included in the free Lite edition.
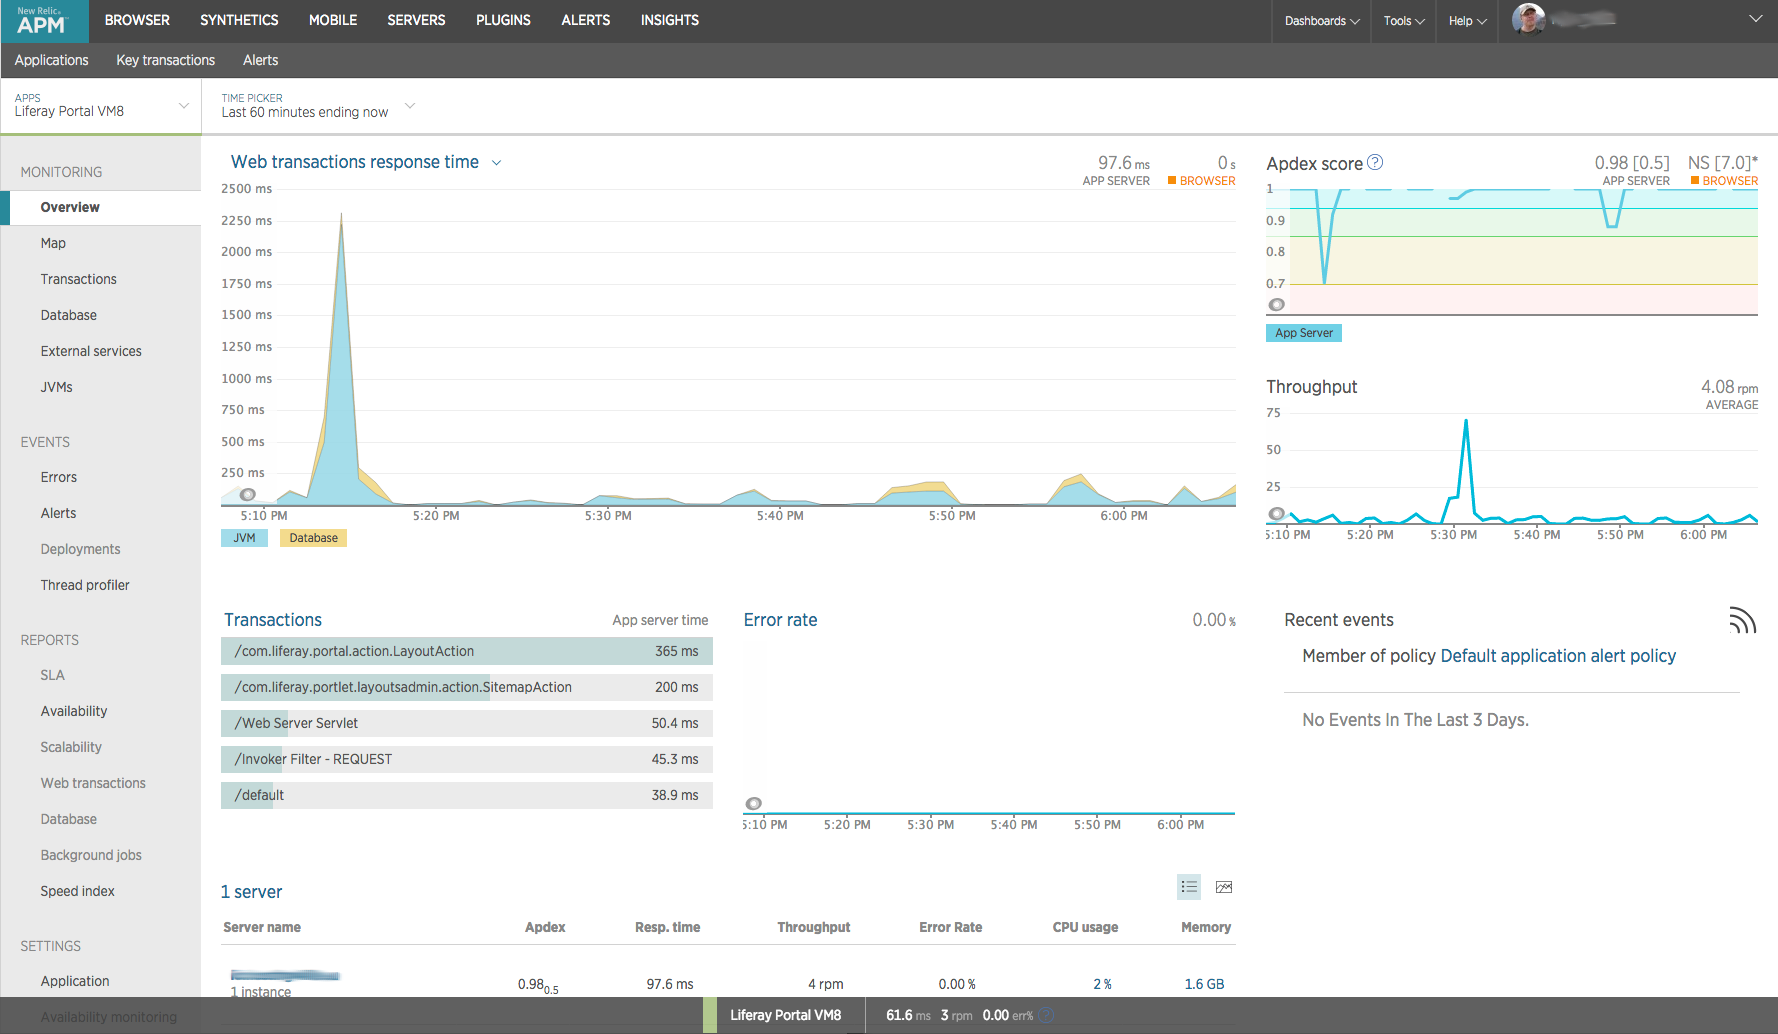
APM

APM is the application monitoring part. It focuses on providing information about the application itself. The Lite edition shows you response times, throughput, web transaction information. It’s basically a low impact profiler. With the Pro subscription you get much deeper analysis of time spent on executing SQL, JVM statistics etc.

New Relic APM Java Overview

Browser

The browser provides insights on client side performance. Even though your application might respond quickly the users perceived performance could be poor because of network performance or even how the page is rendering on the browser.
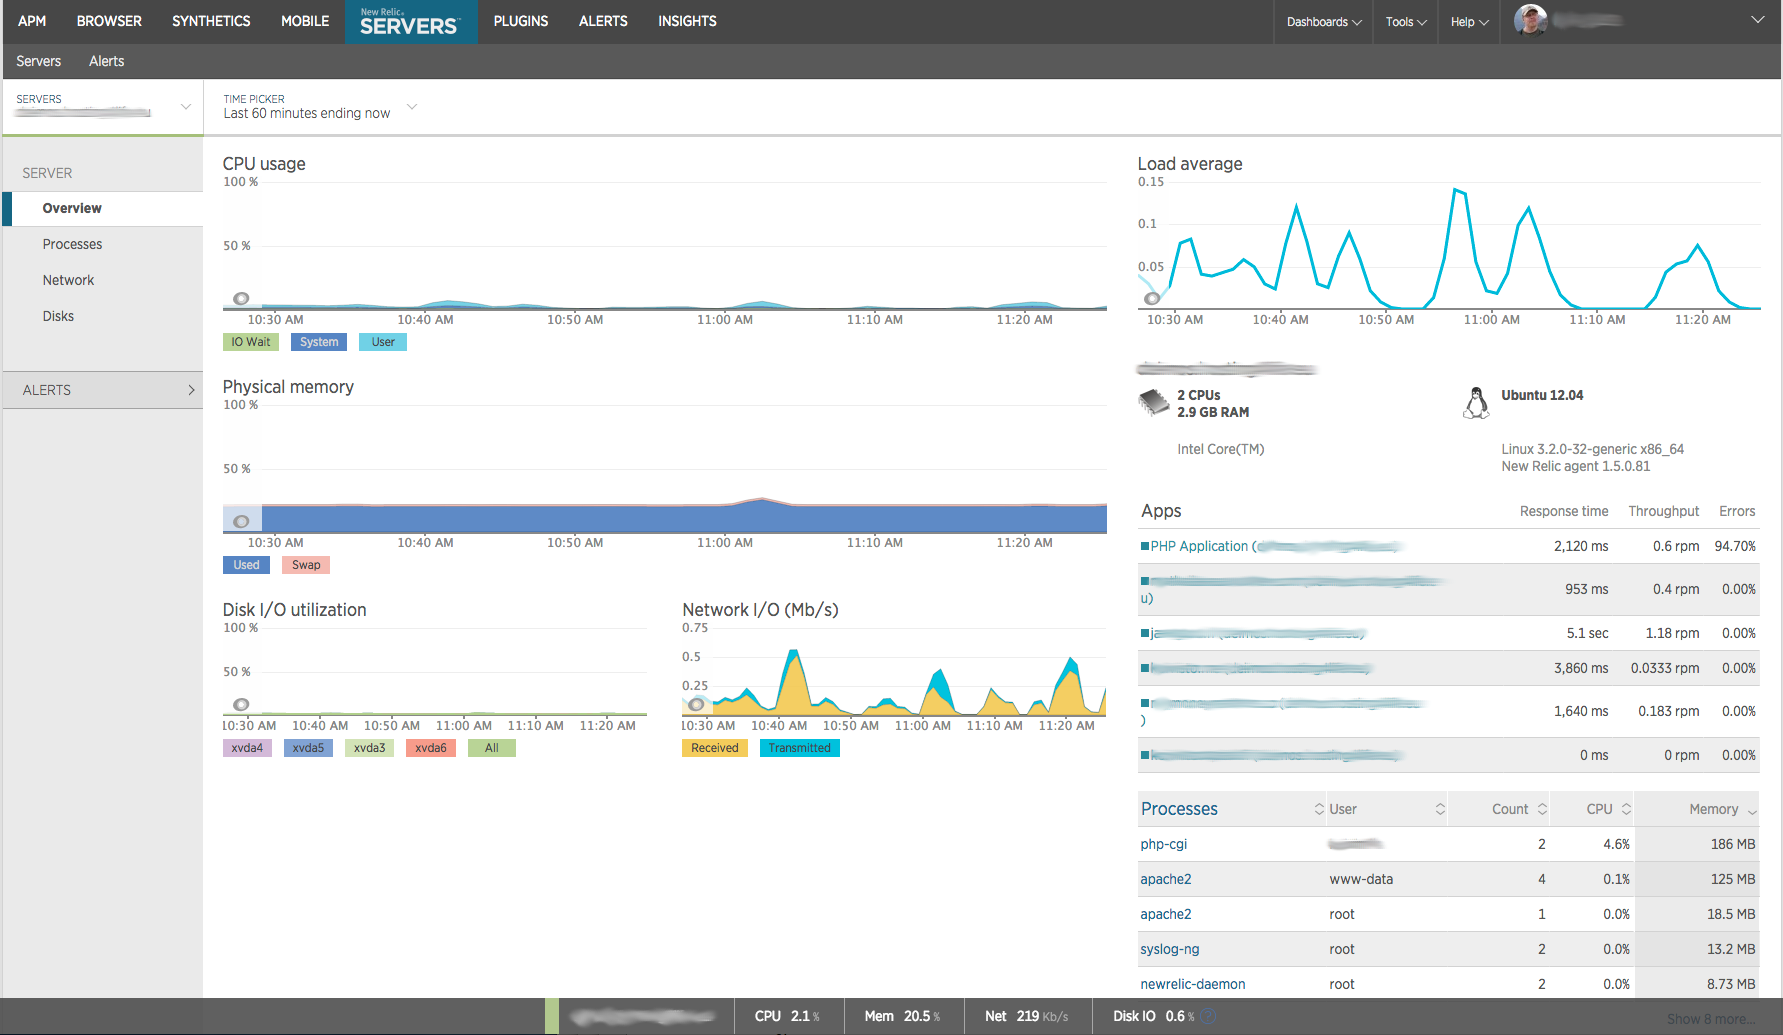
Servers

Servers as the name suggests provides performance information about the actual server your applications are running on.
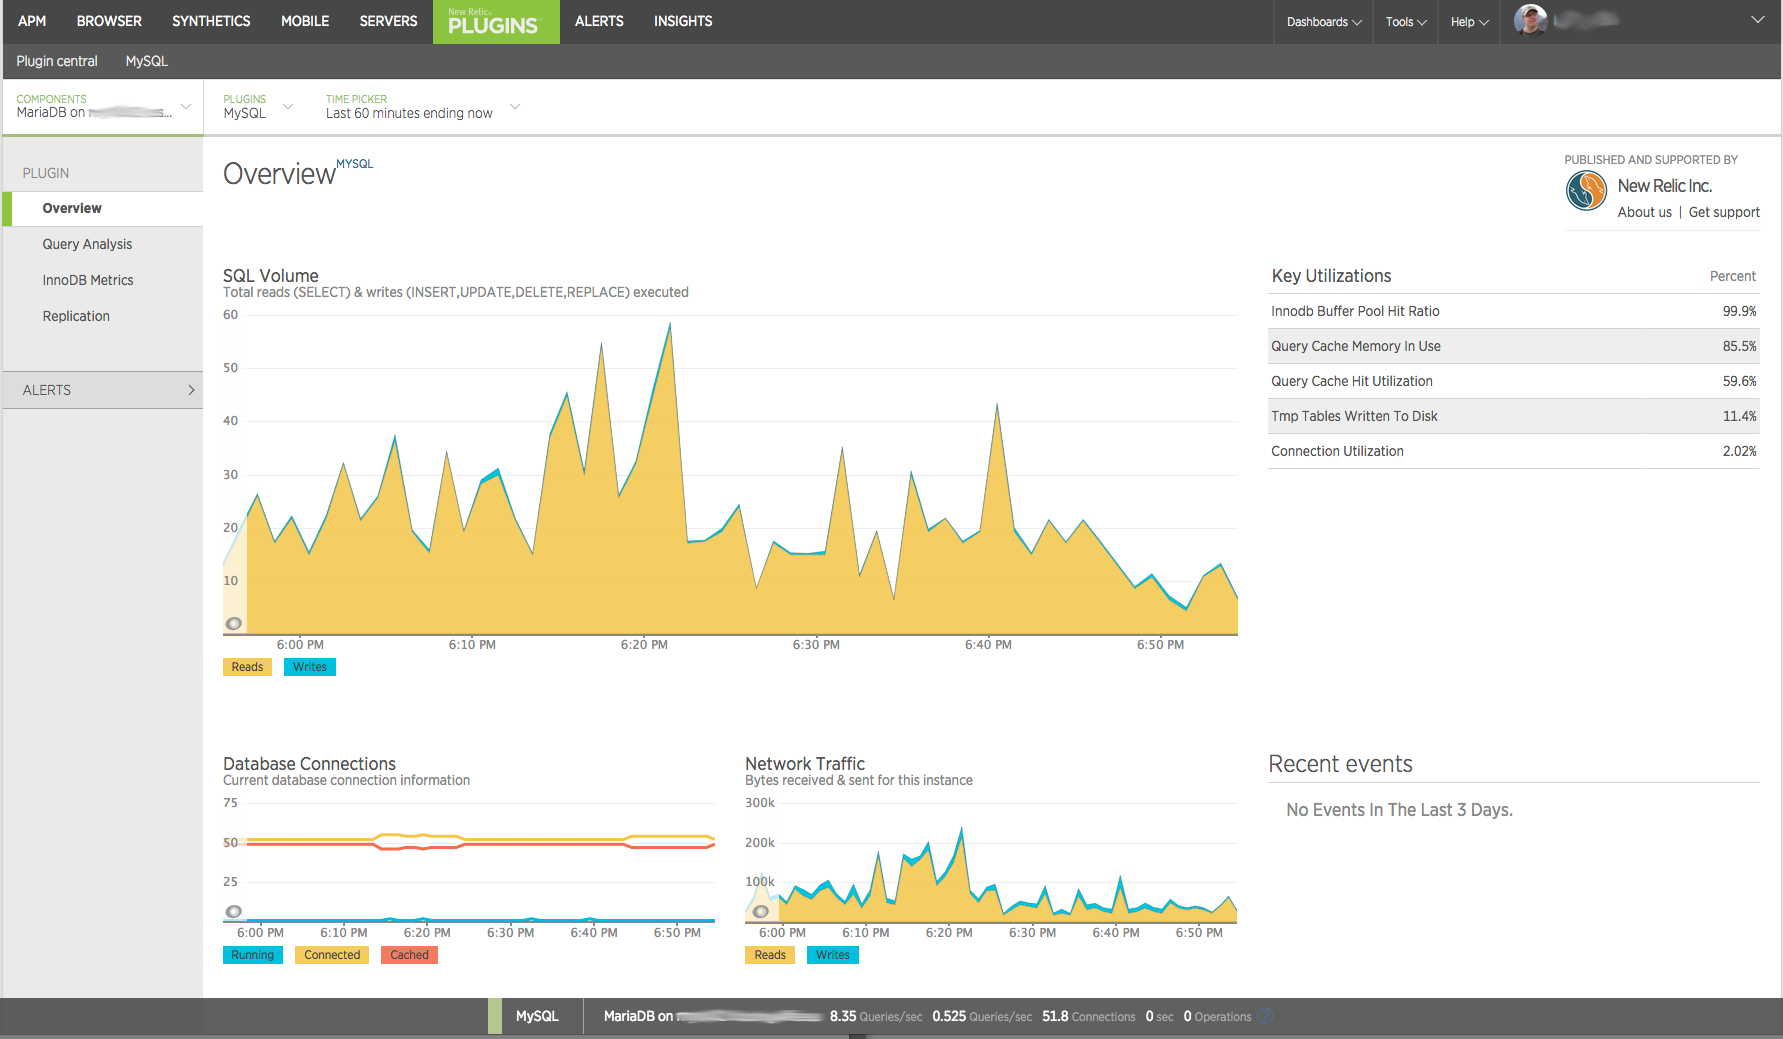
New Relic Servers Overview

Plugins

There’s a ton of plugins to provide monitoring capabilities to systems not otherwise supported by New Relic and with it’s SDKs and API you can build your own plugins. Some of the plugins I have used are for MySQL/MariaDB, Nginx and Apache.

New Relic Plugins MySQL Overview

Mobile

Mobile is APM for mobile applications.

Synthetics

Synthetics allows you to test your application from around the world. It can check business critical user flows and interaction to make sure your site available and functioning from around the world.

Insights

Insights is a paid feature that combines business metrics with performance data. It can combine data from APM, Browser, Mobile and Synthetics for deeper analysis and segmentation and filtering.

Since I recently installed bunch of new servers and I had to refresh my memory on how I installed and configured each of the agents so I decided to write a series of articles on each of them. Here’s a list of topics I’m going to publish and as I publish them I’ll link the topic to the article. These topics will cover APM with Java and PHP, Servers and Plugins for MySQL, Nginx and Apache

  • Monitoring Ubuntu / Debian Servers
  • Monitoring MariaDB / MySQL
  • Monitoring Nginx
  • Monitoring Apache
  • Monitoring Tomcat
  • Monitoring PHP Applications
April 22 2015

Unattended Java install on Ubuntu 14.04

Mika Koivisto General debian, installer, java, ubuntu

I like to to automate all the tasks I do often and of the things many of my virtual servers need is Java JDK. Unfortunately the Oracle JDK is not available as debian package but there’s a way to make it. This is where WebUpd8 Team PPA comes in as they provide installer for java6, java7 and java8.

Below is the script I use to install it unattended. You can download it also from github gist. If you want Java6 then just use oracle-java6-installer and for Java 8 oracle-java8-installer. This also works other ubuntu versions just substitute trusty with the code of your ubuntu release like precise for Ubuntu 12.04. Hope you find this useful.

cat - <<-EOF >> /etc/apt/sources.list.d/webupd8team-java.list
# webupd8team repository list 
deb http://ppa.launchpad.net/webupd8team/java/ubuntu trusty main
# deb-src http://ppa.launchpad.net/webupd8team/java/ubuntu trusty main
EOF

apt-key adv --recv-keys --keyserver keyserver.ubuntu.com 0xEEA14886

echo debconf shared/accepted-oracle-license-v1-1 select true | /usr/bin/debconf-set-selections
echo debconf shared/accepted-oracle-license-v1-1 seen true | /usr/bin/debconf-set-selections

apt-get update
apt-get install oracle-java7-installer
January 28 2015

New Site New Focus

Mika Koivisto General 0

It’s been a while since I last posted anything and the site has been quite stale and out dated. So I thought I’d update it to a more modern responsive site that looks good on both desktop and mobile. As I wanted to focus more on actual writing and less on building a site I moved back to WordPress which is still the best blogging platform. My only concern is now security as php apps are much more prone to being hacked than Java ones.

With this new focus I’m also going to write about much more broad topics than just Liferay. As Liferay is moving it’s core towards OSGi I’ve studied it a lot and grown to love it although it doesn’t come without it’s own challenges especially for some moving to it from Java EE. As some of you may know I’ve been running and administering my own Linux servers for more than 15 years so some of the new topics will be about virtualization, containers, monitoring etc. I still read a lot of books so when I read one that deserves a mention I’ll write a book review. I hope you enjoy what’s to come.

As I built this new site I only migrated posts that had been read in the past year so if you run into something that’s no longer available do email me I still have them saved. Also all the old urls should be automatically redirected to the new ones.

October 17 2013

Monitoring and Graphing Liferay with MRTG

Mika Koivisto Howto jmx, jmx4perl, jolokia, liferay, monitoring, mrtg 0

MRTG (The Multi Router Traffic Grapher) is usually used to monitor SNMP enabled network devices and draw graphs of how much traffic has passed through each interface. It can also be used to graph any two values (in/out) and I use it for graphing cpu usage, loadavg, iowait, used memory, disk space and temperature sensor values that I can read through SNMP. Liferay however doesn’t support SNMP so I developed a perl script that can read JMX MBean values using JMX4Perl and Jolokia. I’m going to assume you have JMX4Perl and Jolokia setup already the way I describe it in my earlier post: Monitoring Liferay with Nagios, Jolokia and JMX4Perl. You should also note that MRTG won’t send you any alerts so it’s a good idea to setup Nagios to do just that. More

June 19 2013

Liferay Maven Support in Liferay 6.1 GA3

Mika Koivisto Liferay liferay, maven

We’ve finally released both CE and EE versions of Liferay 6.1 GA3 and along with those releases we’ve also released the corresponding versions of Liferay Maven Support and Portal artifacts. The version numbers are 6.1.2 for CE GA3 and 6.1.30 for EE GA3. With this release there is one significant improvement in the Liferay Maven Plugin and that is they are no longer directly dependent on a Liferay Portal version. We could have just released one version and it would have worked with either portal version, in fact they both work with any portal version starting from 6.1.0. In the future we will probably move to a single release of Liferay Maven Support which will eventually have it’s own release cycle completely independent of the portals release cycle.   More

August 19 2012

Installing MariaDB on Ubuntu

Mika Koivisto Howto mariadb, mysql, ubuntu 0

I’ve been using MariaDB for some time now and it’s perfect replacement for MySQL especially with the latest news onOracle’s move to hinder MySQL developer community despite it’s promise to EU. Now is a perfect time to ditch MySQL and move to something that’s backed by the original authors of MySQL and that something is MariaDB.

1. First pick your Ubuntu version repository mirror close to you from MariaDB downloads page. Once you’ve picked up your mirror then add them to /etc/apt/source.list.d/mariadb.list. I’m still running 10.04 so here’s what I put in my mariadb.list:

# MariaDB repository list - created 2012-07-04 18:04 UTC
# http://downloads.mariadb.org/mariadb/repositories/
deb http://ftp.heanet.ie/mirrors/mariadb/repo/5.5/ubuntu lucid main
deb-src http://ftp.heanet.ie/mirrors/mariadb/repo/5.5/ubuntu lucid main

2. Next you’ll need to import the signing key

sudo apt-key adv --recv-keys --keyserver keyserver.ubuntu.com 0xcbcb082a1bb943db

3. Update

aptitude update

4. Install

aptitude install mariadb-server-5.5

Now you have MariaDB 5.5 installed and you can configure it exactly like you would configure MySQL.

August 8 2012

Liferay 6.1 GA2 Maven release

Mika Koivisto Liferay

I’m glad to announce that we have release maven artifacts for Liferay 6.1 GA2 for both EE and CE. The CE version of portal artficats are in currently in Sonatype’s repository waiting to be synced to Central and EE artifacts are available for download in customer portal like before. We’ve also released the Liferay Maven Support project that is the plugins sdk equivalent for Maven.  Both CE and EE compatible versions are being synced to Central. Please remember that this is not supported through your portal support contract. If you find any bugs in the Maven plugin or archetypes please file them to the MAVEN Jira project. The CE GA2 version number is 6.1.1 and EE GA2 version number is 6.1.20. Remember to use a version corresponding to your running portal version as mixing versions might cause problems. More

August 5 2012

Tips for securing your Liferay installation

Mika Koivisto General deployment, liferay, security 0

There’s few security related things that I see people constantly doing wrong. The very first thing is assuming Liferay bundle with it’s default settings is secure for production. It is far from secure. Don’t get me wrong this doesn’t mean that Liferay isn’t secure it just means that shouldn’t deploy Liferay with it’s default settings and assume it’s secure. So let’s go over some things you should consider.

Default admin user

Everyone knows the default admin user [email protected] and some attacks have taken advantage knowing this user and even it’s userid which is predictable. What I would suggest is not only to change the email address and screenname of this user but actually create a completely new admin user and remove this user.

Portal instance web id

The default company web id is liferay.com and it goes without saying you should change it unless you are actually deploying liferay.com. You can do this simply by setting company.default.web.id property in your portal-ext.properties. This must be done before you start your portal and let it generate the database.

Encryption algorithm

By default Liferay is configured to use 56bit DES encryption algorithm. I believe this legacy is due to US encryption export laws. The problem with 56bit DES is that it was cracked back in the 90s and is not considered secure encryption anymore. Liferay encrypts certaing things with this like your password in Remember Me cookie. If someone get’s a hold of that cookie they can crack your password. I would recommend using at least 128bit AES. To do that you’ll just need to set following properties before starting your portal against a clean database.

company.encryption.algorithm=AES
company.encryption.key.size=128

Password hashing

Recently there has been a lot of sites that have their passwords being compromised because they weren’t using salt with their password hash. Liferay by default uses SHA-1 to hash your password. That hash is a one way algorithm that doesn’t allow reversing the password from the hash but if someone gets a hold of your password hash it’s still possible to crack with brute force or by using rainbow tables. Rainbow tables are precalculated hashes that allow very easily and fast find unsalted passwords. Salt is something we add to the password before hashing it and it’s preferrable unique of each password so that even if two users have the same password their hash is different. Liferay comes with SSHA algorithm that salts the password before calculating the SHA-1 hash from it. You can enable it by setting following in your portal-ext.properties

password.encryption.algorithm=SSHA

Unused SSO hooks

The default Liferay bundle comes with all SSO hooks included even thought they are not all enabled it’s a good idea to remove any hooks your are not using. There’s a property called auto.login.hooks and you should remove all hooks your are not using. Also remember to disable their associated filters.

Unused Remote APIs

Liferay has several different remote APIs such as JSON, JSONWS, Web service, Atom, WebDAV, Sharepoint etc. You should go through them and disable everything your site is not using. Please note that some Liferay builtin portlets rely on some of these APIs. All the APIs are accessible under /api URL.

Mixed HTTP and HTTPS

Everyone should by now know about Firesheep a firefox extension that allows an attacker to sniff a wifi network they are connected to and hijack a users authenticated session. This attack can compromise any website that doesn’t use all authenticated traffic over https. If you use https for just part of the site and your users can access rest of the site as authenticated user over http then your are vulnerable to Firesheep attack. This is especially bad with Liferay if you are using the default encryption and you use Remember me functionality because then the attacker could even compromise your password and use it login to any system where you use the same password. I’m sad to say that even Liferay.com is vulnerable to this attack.

Shared Secrets

Don’t forget to change any shared secrets. The auth.token.shared.secret has a default value that you want to change so that no-one can try to exploit it. This tip came from Jelmer who has found many vulnerabilities in Liferay.  Another one you don’t want to overlook is auth.mac.shared.key which has default value of blank. That one is relevant if you auth.mac.allowset to true.

This is not an exhaustive list but this should make your Liferay installation much more secure than it is by default. For more tips on what to configure before going to production check out Liferay whitepapers. You should especially read the deployment checklist. If you can think of any other things that should be on this list comment them or tweet them to me @koivimik

Update: Added shared secret tip from Jelmer

July 29 2012

Monitoring Liferay with Nagios, Jolokia and JMX4Perl

Mika Koivisto Howto jmx, jmx4perl, jolokia, liferay, monitoring, nagios, tomcat 3

How do I monitor Liferay? That’s a question I’ve heard a lot lately. Well the standard way of getting some information about the application is by using JMX. The downside of JMX is that it’s a Java only standard and the only remote connection is by using RMI which doesn’t really sit well with non Java monitoring software like very popular Nagios. Another hurdle might be that your network admin might not be inclined to open up RMI access to the jvm.

There’s a nice agent called Jolokia that can provide a http bridge to JMX. You can install it as java agent in pretty much any java app or deploy it as a webapp. With Jolokia installed you can query any MBeans for their values using a simple http GET and get the data as JSON objects. JMX4Perl is a perl module and scripts that provide a easy way to run those queries through Jolokia. One of those scripts is check_jmx4perl which can be used in nagios service checks.

Okay so now we know that we are going to need Nagios, Jolokia and JMX4Perl to monitor the Liferay JVM but what should we monitor? Well that depends on what information you are interested in but at minimum I would monitor ajp or http thread usage as well as heap utilization. Just by monitoring those values you’ll know when your JVM is becomes unresponsive and can also get some early warning that there’s issues for example heap usage goes over warning threashold and never returns to normal or keeps constantly going over the threshold which could indicate they you don’t have enough heap allocated.

I’m going to assume that you have  nagios installed and configured and I will only go through how to install Jolokia and configure some checks for threads and heap. So let’s start by installing JMX4Perl.

Installing JMX4Perl is pretty simple with cpan. You just launch cpan command line client and install it like this:

cpan> install JMX::Jmx4Perl

Next you’ll need to download Jolokia and deploy the jolokia.war to your app server. For this example I’m going to assume that you are using Tomcat 7. Once you’ve deployed Jolokia it’s usually good idea to restrict who can query it. For this example we are just going to restrict it to a certain IP address (the Nagios server) and limit it to read operations only. Since I don’t like modifying the war we are going to tell Jolokia where to find the policy file through a context parameter. Create a jolokia.xml in tomcat/conf/Catalina/localhost with following content:

<Context path="/jolokia">
        <Parameter name="policyLocation" value="file:///etc/jolokia/jolokia-access.xml" />
</Context>

That tells Jolokia to look for the policy file jolokia-access.xml from /etc/jolokia/jolokia-access.xml. This is great when you are running multiple tomcats in the same server and want them to share the jolokia policy file.

Now go ahead and create the jolokia-access.xml in /etc/jolokia

<?xml version="1.0" encoding="utf-8"?>
<restrict>
        <remote>
                <host>[YOUR NAGIOS SERVER IP]</host>
        </remote>
        <http>
                <method>get</method>
                <method>post</method>
        </http>
        <commands>
                <command>read</command>
        </commands>
</restrict>

Next we need to create configuration for jmx4perl. In /etc/jmx4perl/jmx4perl.cfg we are going to include some preconfigured checks extend them. Tomcat 7 you need to add quotes around the thread pool name. We also need to set warning and critical levels for alerts. You’ll also need to add a Server for each tomcat you want to monitor.

# Default definitions
include default/memory.cfg
include default/tomcat.cfg

# ==========================
# Check definitions

<Check tc7_connector_threads>
	Use = relative_base($1,$2)
	Label = Connector $0 : $BASE
	Value = Catalina:name="$0",type=ThreadPool/currentThreadCount
	Base = Catalina:name="$0",type=ThreadPool/maxThreads
	Critical 95
	Warning 90
</Check>

<Check j4p_memory_heap>
	Use memory_heap
	Critical 95
	Warning 90
</Check>

<Server tomcat>
	Url http://MY_TOMCAT_HOSTNAME:8080/jolokia
</Server>

Then in /etc/nagios3/commands.cfg we’ll need to add a check command for jmx4perl and we’ll use the check_jmx4perl script to do that.

define command {
	command_name    check_j4p_cmd
	command_line    /usr/local/bin/check_jmx4perl --unknown-is-critical --config /etc/jmx4perl/jmx4perl.cfg --server $ARG1$ --check $ARG2$ $ARG3$
}

Then we need to define a service to monitor in /etc/nagios3/conf.d/host-MY_TOMCAT_HOSTNAME.cfg

define service {
	use generic-service
	host_name MY_TOMCAT_HOSTNAME
	service_description Tomcat Heap Memory
	check_command check_j4p_cmd!tomcat!j4p_memory_heap!x
}

define service {
	use generic-service
	host_name MY_TOMCAT_HOSTNAME
	service_description Tomcat AJP Threads
	check_command check_j4p_cmd!tomcat!tc7_connector_threads!ajp-bio-8009
}

The check above is for your tomcat heap and the other one is for Tomcat 7 AJP threads.

Now you should all the pieces to implement your own monitoring using Nagios, Jolokia and JMX4Perl. You should also remember that you can apply this to any JEE application not just Liferay.

July 18 2012

Configuring c3p0 connection pool for Liferay on Tomcat

Mika Koivisto Howto c3p0, connection pool, jndi, liferay, tomcat 0

There’s several ways you could configure a connection pool for Liferay on Tomcat but the way I’m going to show is the JEE way and the only one I consider correct.

The first thing is to copy or move the c3p0.jar from webapps/ROOT/WEB-INF/lib/ to lib/. Also make sure you have your dabase driver there. In this example it would be mysql.jar.

Then we need to tell Liferay that you want to use a connection pool from JNDI and this you can do by adding following line to your portal-ext.properties which can be placed in Liferay Home directory (the directory above tomcat).

jdbc.default.jndi.name=jdbc/LiferayPool

Add following snippet to conf/server.xml inside GlobalNamingResources. Adjust the pool size and idle time and connection test period according to your environment. They are particularly important when you have a firewall between your Liferay and database or when the database server drops connections after certain idle period.

<Resource
    name="jdbc/LiferayPool"
    auth="Container"
    type="com.mchange.v2.c3p0.ComboPooledDataSource"
    factory="org.apache.naming.factory.BeanFactory"
    driverClass="com.mysql.jdbc.Driver"
    jdbcUrl="jdbc:mysql://localhost/lportaluseUnicode=true&amp;characterEncoding=UTF-8&amp;useFastDateParsing=false"
    user="lportal"
    password="test"
    minPoolSize="10"
    maxPoolSize="20"
    maxIdleTime="600"
    preferredTestQuery="select 1 from dual"
    idleConnectionTestPeriod="180"
    numHelperThreads="5"
    maxStatementsPerConnection="100"
/>

Now we need to link the jdbc/LiferayPool name defined in portal-ext.properties to the jdbc/LiferayPool defined in server.xml and this definition goes to conf/Catalina/localhost/ROOT.xml

<ResourceLink name="jdbc/LiferayPool" global="jdbc/LiferayPool" type="javax.sql.DataSource"/>

Now we are done and you can start your tomcat with the new connection pool. Note you can follow similar process to configure MailSession from JNDI.

1 2 3 4

Tags

activemq apache backup c3p0 certificate connection pool debian debugging deployment git heap hook httpd https installer java jms jmx jmx4perl jndi jolokia jvm liferay mariadb maven memory monitoring mrtg mysql nagios newrelic nginx ngx_cache_purge pagespeed performance repository salesforce saml security spring ssl struts tls tomcat ubuntu

Categories

  • General
  • Howto
  • Liferay

Recent Posts

  • cyber_securityHow to get Tomcat to see HTTPS when it’s terminated elsewhere
  • failTop 3 reasons why Liferay projects fail
  • FIDO-Yubico-YubiKeys-2-444x296Liferay Yubikey OTP Login
  • nginxCreating a custom Nginx build for Ubuntu/Debian
  • getting-git-rightMoving a project from one git repository to another while retaining it’s history

Archives

  • October 2017
  • February 2017
  • January 2017
  • July 2016
  • June 2016
  • May 2016
  • August 2015
  • April 2015
  • January 2015
  • October 2013
  • June 2013
  • August 2012
  • July 2012
  • June 2012
  • May 2012
  • March 2012
  • February 2012
  • January 2012
  • January 2011
  • September 2010
  • August 2010
  • December 2009
  • October 2008
  • December 2007

Recent Posts

  • cyber_securityHow to get Tomcat to see HTTPS when it’s terminated elsewhere
  • failTop 3 reasons why Liferay projects fail
  • FIDO-Yubico-YubiKeys-2-444x296Liferay Yubikey OTP Login
  • nginxCreating a custom Nginx build for Ubuntu/Debian
  • getting-git-rightMoving a project from one git repository to another while retaining it’s history

Follow me on Twitter

My Tweets
© JGuru 2006 - 2017