Monitoring MariaDB / MySQL with New Relic
In order to size your system correctly you need metrics and you need those also from your database. Not only is it important to know what’s happening in your database for capacity planning it’s also invaluable information when something goes wrong. If you have a database related performance problem in your code seeing how the fix effects the database can help you see if you actually solved the problem. Also looking at database statistics you might be able to spot a issue before it becomes a serious problem.
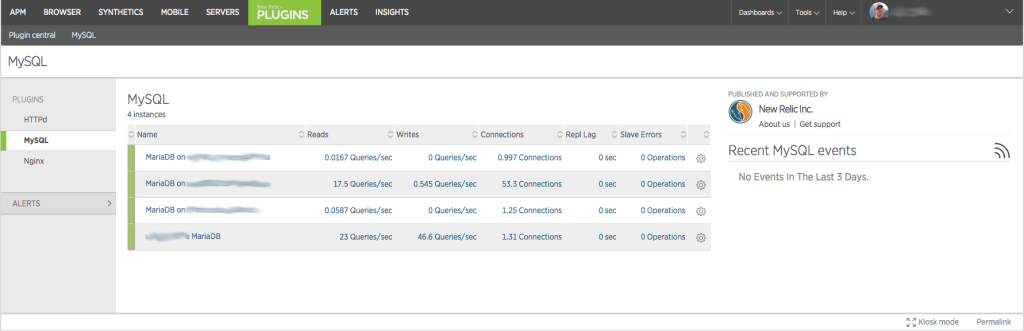
New Relic has a wonderful plugin framework and there’s a ton of ready made plugins and also SDK and API for things it doesn’t already support. MySQL plugin is one of those ready made plugins and it provides all the key information you’ll need. The MySQL plugin page quickly shows what’s going on all monitored databases.
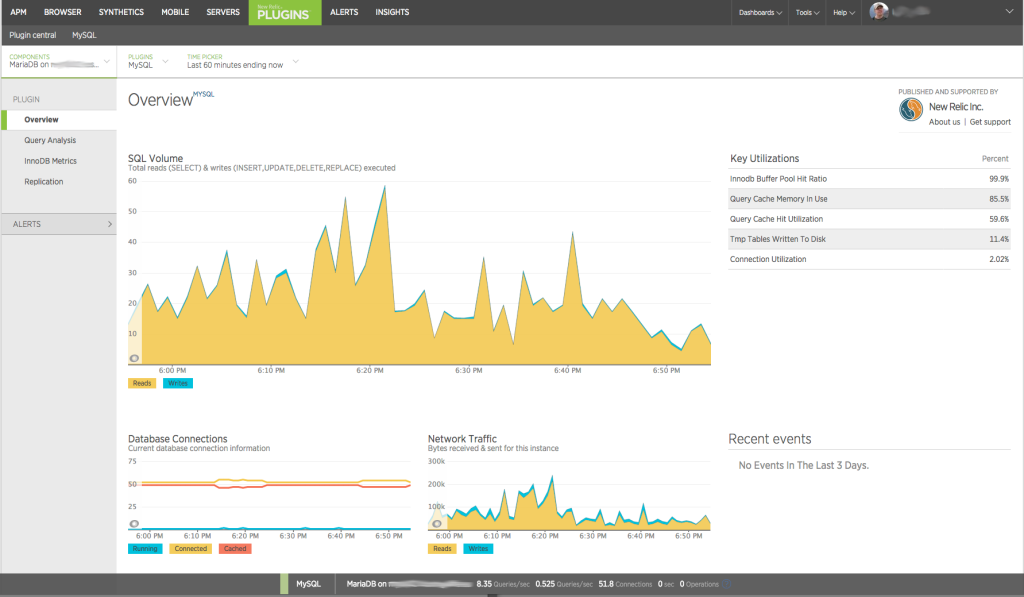
When you drill down to a individual database server the overview shows the SQL volume and how it’s split between reads and writes. More key metrics are displayed under Key Utilizations. You’ll also find database connections and network traffic on this page.
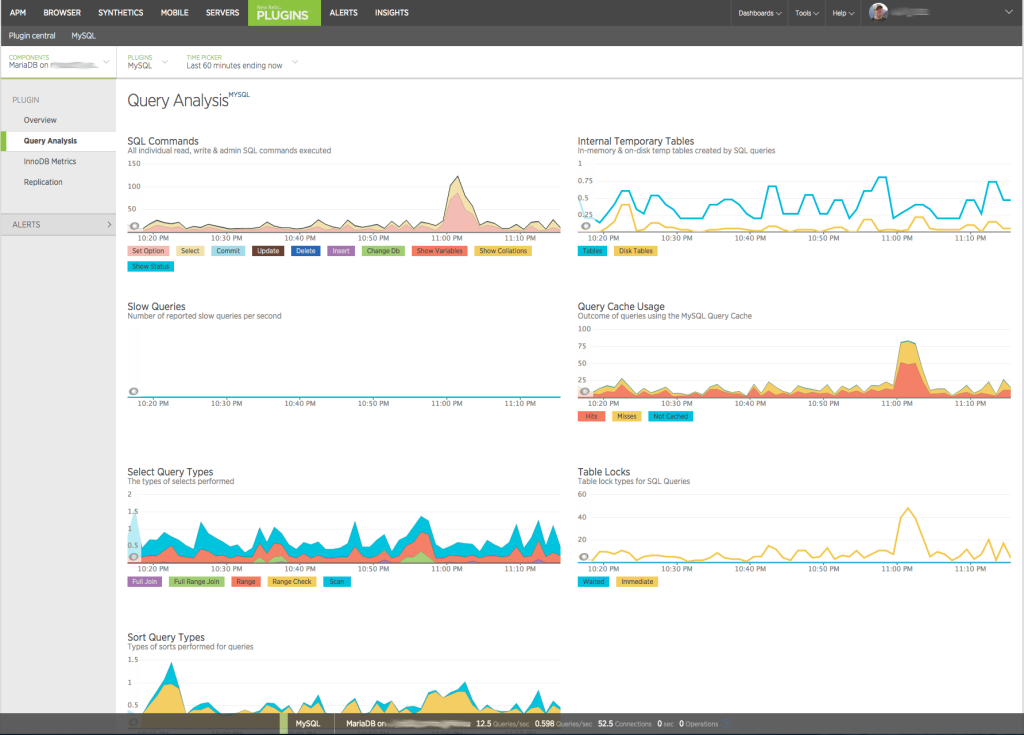
Going further down to Query analysis you’ll see in more details about the queries.
If you are using InnoDB there’s a separate page to show key metrics from InnoDB.

Installing MySQL / MariaDB Monitoring
1) MySQL plugin can easily be installed with New Relic platform installer. So the first thing you need to do is install the platform installer. You’ll need your New Relic license key which you can find from account settings on rpm.newrelic.com. Once you have that you can install it with following one liner which is for 64bit Debian and Ubuntu.
LICENSE_KEY=YOUR_LICENSE_KEY bash -c "$(curl -sSL https://download.newrelic.com/npi/release/install-npi-linux-debian-x64.sh)"2) Next go to the newly created newrelic-npi directory and run install. You’ll want to answer yes to all the questions and when prompted to configure the plugin grab the configuration from the next step.
./npi install nrmysql3) If you skipped configuration you can configure the plugin afterward too. You can find the configuration file under newrelic-npi from plugins/com.newrelic.plugins.mysql.instance/newrelic_mysql_plugin-2.0.0/config/plugin.json. Below is a sample configuration for MariaDB (works for MySQL) running on localhost and we’ll be creating a separate user newrelic with password somepassword which the plugin will use to gather data. You can connect to multiple databases with the same agent. I usually install this agent on the same server my nagios is running on.
{
 "agents": [
   {
     "name" : "MariaDB on localhost",
     "host" : "localhost",
     "metrics" : "status,newrelic,buffer_pool_stats,innodb_status,innodb_mutex",
     "user" : "newrelic",
     "passwd" : "somepassword"
   }
 ]
}
4) Now we need to create a user in the database and grant some rights to it.
cat - <<EOF | mysql -u root -p
CREATE USER newrelic@'%' IDENTIFIED BY 'somepassword';
GRANT PROCESS,REPLICATION CLIENT ON *.* TO newrelic@'%';
EOF
5) Last thing is to start the service but before we do make sure you have Java installed as this agent is written in Java. If you don’t have Java installed check my unattended Java install script. Otherwise you can proceed to start the service that should have been created during npi install if you answered all the questions correctly.
service newrelic_plugin_com.newrelic.plugins.mysql.instance start
Now it may take few minutes before you see your server under Plugins MySQL in rpm.newrelic.com. If it doesn’t check the log under plugins/com.newrelic.plugins.mysql.instance/newrelic_mysql_plugin-2.0.0/logs/ for hints and make sure the agent actually started.


