New Relic has seven parts or products as they call them. Those are APM, Insights, Mobile, Browser, Synthetics, Servers and Plugins. I have myself used only APM, Browser, Server and Plugins which are included in the free Lite edition.
APM
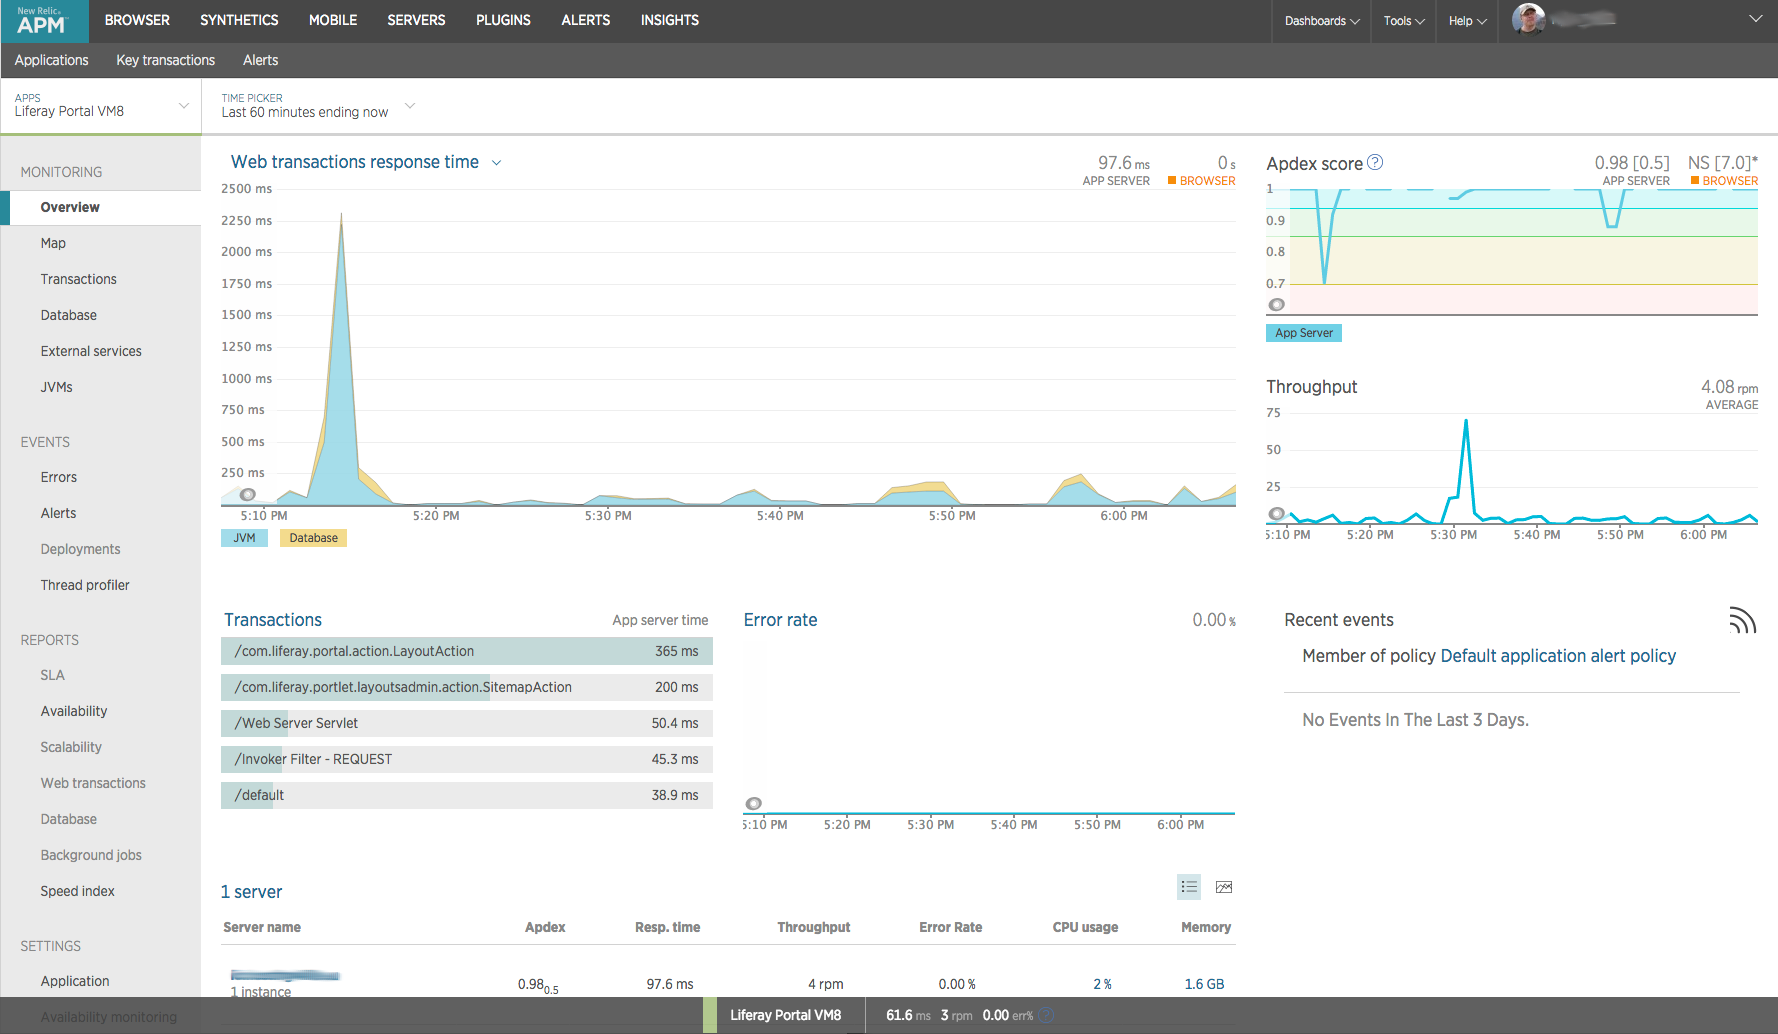
APM is the application monitoring part. It focuses on providing information about the application itself. The Lite edition shows you response times, throughput, web transaction information. It’s basically a low impact profiler. With the Pro subscription you get much deeper analysis of time spent on executing SQL, JVM statistics etc.
Browser
The browser provides insights on client side performance. Even though your application might respond quickly the users perceived performance could be poor because of network performance or even how the page is rendering on the browser.
Servers
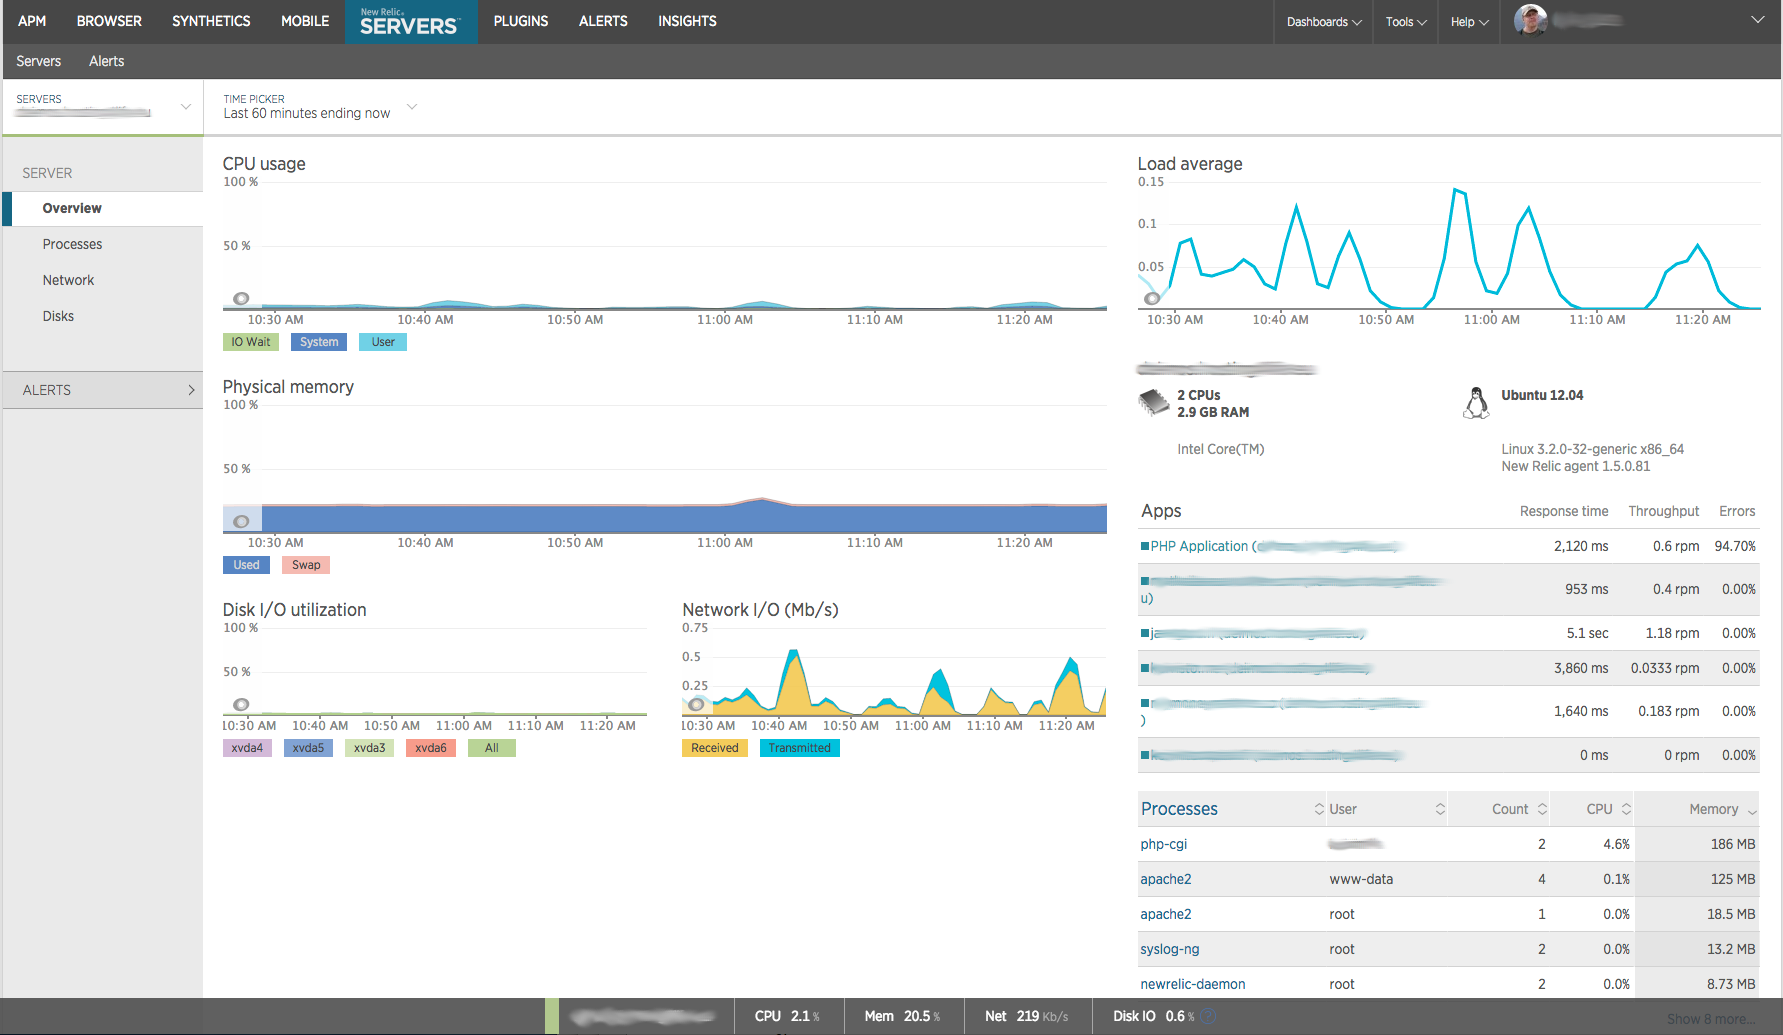
Servers as the name suggests provides performance information about the actual server your applications are running on.
Plugins
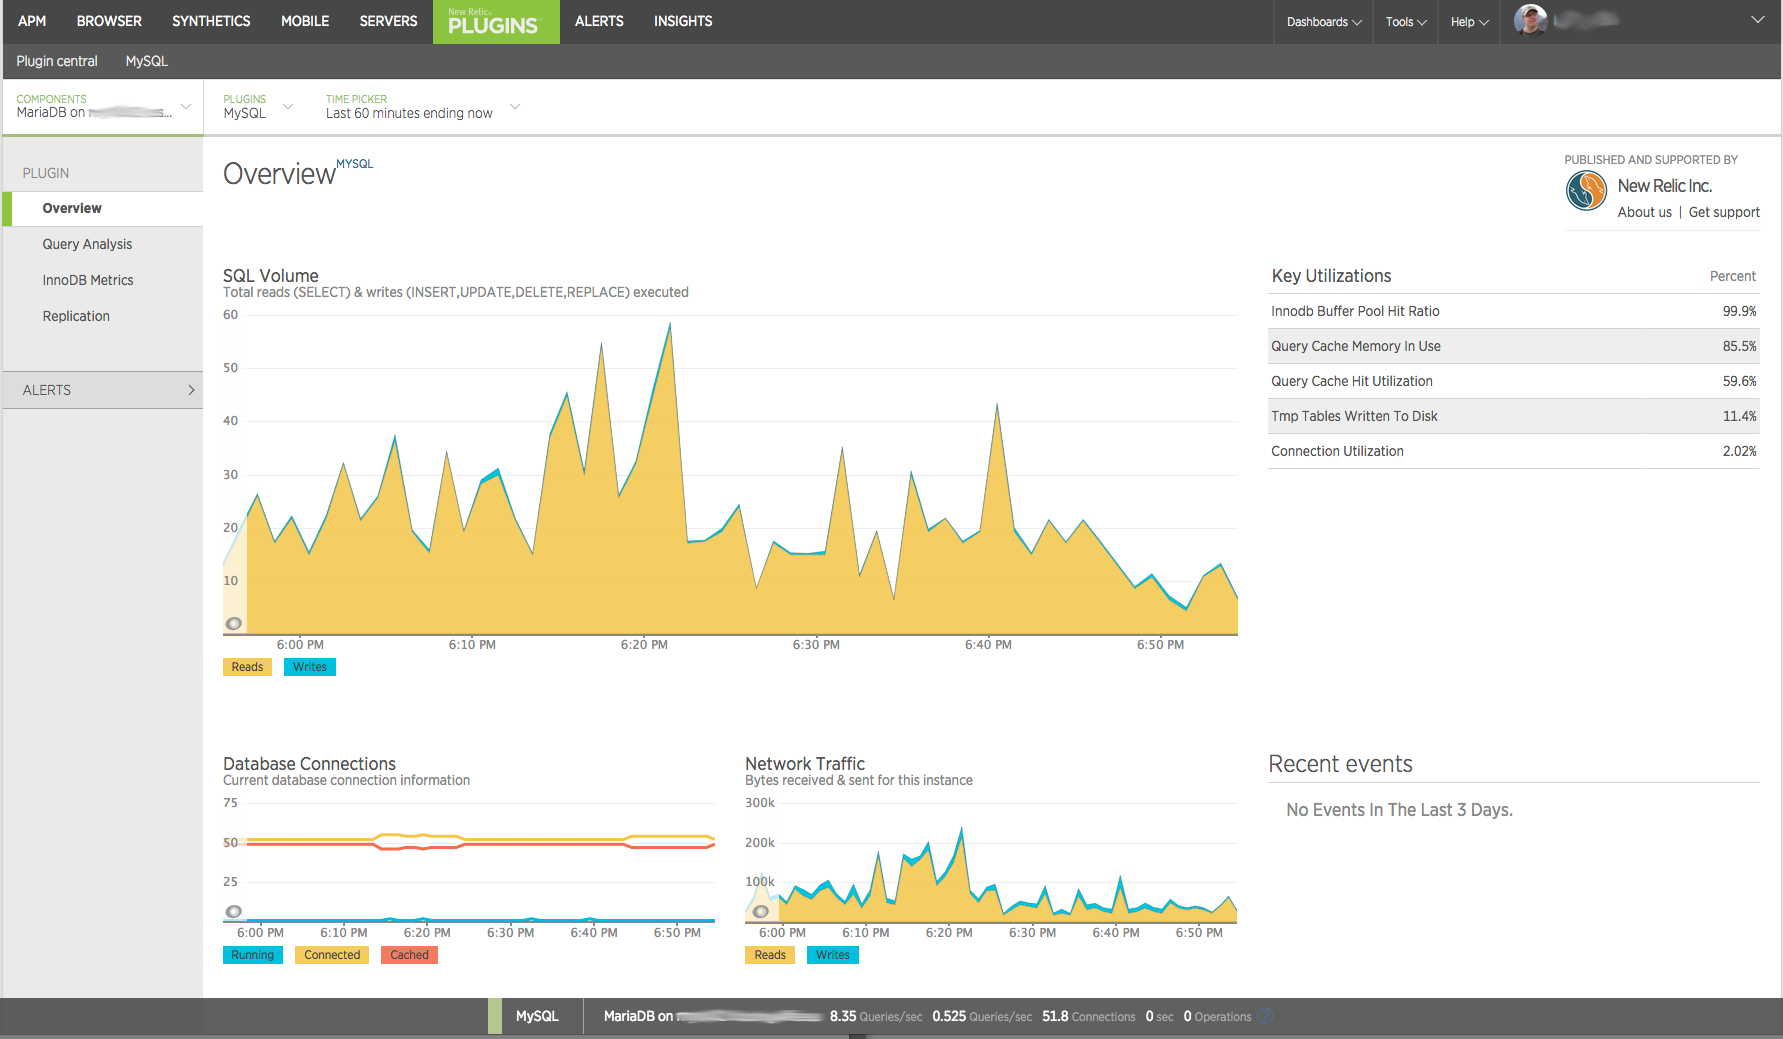
There’s a ton of plugins to provide monitoring capabilities to systems not otherwise supported by New Relic and with it’s SDKs and API you can build your own plugins. Some of the plugins I have used are for MySQL/MariaDB, Nginx and Apache.
Mobile
Mobile is APM for mobile applications.
Synthetics
Synthetics allows you to test your application from around the world. It can check business critical user flows and interaction to make sure your site available and functioning from around the world.
Insights
Insights is a paid feature that combines business metrics with performance data. It can combine data from APM, Browser, Mobile and Synthetics for deeper analysis and segmentation and filtering.
Since I recently installed bunch of new servers and I had to refresh my memory on how I installed and configured each of the agents so I decided to write a series of articles on each of them. Here’s a list of topics I’m going to publish and as I publish them I’ll link the topic to the article. These topics will cover APM with Java and PHP, Servers and Plugins for MySQL, Nginx and Apache
- Monitoring Ubuntu / Debian Servers
- Monitoring MariaDB / MySQL
- Monitoring Nginx
- Monitoring Apache
- Monitoring Tomcat
- Monitoring PHP Applications
Below is the script I use to install it unattended. You can download it also from github gist. If you want Java6 then just use oracle-java6-installer and for Java 8 oracle-java8-installer. This also works other ubuntu versions just substitute trusty with the code of your ubuntu release like precise for Ubuntu 12.04. Hope you find this useful.
cat - <<-EOF >> /etc/apt/sources.list.d/webupd8team-java.list
# webupd8team repository list
deb http://ppa.launchpad.net/webupd8team/java/ubuntu trusty main
# deb-src http://ppa.launchpad.net/webupd8team/java/ubuntu trusty main
EOF

apt-key adv --recv-keys --keyserver keyserver.ubuntu.com 0xEEA14886

echo debconf shared/accepted-oracle-license-v1-1 select true | /usr/bin/debconf-set-selections
echo debconf shared/accepted-oracle-license-v1-1 seen true | /usr/bin/debconf-set-selections

apt-get update
apt-get install oracle-java7-installer
With this new focus I’m also going to write about much more broad topics than just Liferay. As Liferay is moving it’s core towards OSGi I’ve studied it a lot and grown to love it although it doesn’t come without it’s own challenges especially for some moving to it from Java EE. As some of you may know I’ve been running and administering my own Linux servers for more than 15 years so some of the new topics will be about virtualization, containers, monitoring etc. I still read a lot of books so when I read one that deserves a mention I’ll write a book review. I hope you enjoy what’s to come.
As I built this new site I only migrated posts that had been read in the past year so if you run into something that’s no longer available do email me I still have them saved. Also all the old urls should be automatically redirected to the new ones.
Default admin user
Everyone knows the default admin user [email protected] and some attacks have taken advantage knowing this user and even it’s userid which is predictable. What I would suggest is not only to change the email address and screenname of this user but actually create a completely new admin user and remove this user.
Portal instance web id
The default company web id is liferay.com and it goes without saying you should change it unless you are actually deploying liferay.com. You can do this simply by setting company.default.web.id property in your portal-ext.properties. This must be done before you start your portal and let it generate the database.
Encryption algorithm
By default Liferay is configured to use 56bit DES encryption algorithm. I believe this legacy is due to US encryption export laws. The problem with 56bit DES is that it was cracked back in the 90s and is not considered secure encryption anymore. Liferay encrypts certaing things with this like your password in Remember Me cookie. If someone get’s a hold of that cookie they can crack your password. I would recommend using at least 128bit AES. To do that you’ll just need to set following properties before starting your portal against a clean database.
company.encryption.algorithm=AES
company.encryption.key.size=128
Password hashing
Recently there has been a lot of sites that have their passwords being compromised because they weren’t using salt with their password hash. Liferay by default uses SHA-1 to hash your password. That hash is a one way algorithm that doesn’t allow reversing the password from the hash but if someone gets a hold of your password hash it’s still possible to crack with brute force or by using rainbow tables. Rainbow tables are precalculated hashes that allow very easily and fast find unsalted passwords. Salt is something we add to the password before hashing it and it’s preferrable unique of each password so that even if two users have the same password their hash is different. Liferay comes with SSHA algorithm that salts the password before calculating the SHA-1 hash from it. You can enable it by setting following in your portal-ext.properties
password.encryption.algorithm=SSHA
Unused SSO hooks
The default Liferay bundle comes with all SSO hooks included even thought they are not all enabled it’s a good idea to remove any hooks your are not using. There’s a property called auto.login.hooks and you should remove all hooks your are not using. Also remember to disable their associated filters.
Unused Remote APIs
Liferay has several different remote APIs such as JSON, JSONWS, Web service, Atom, WebDAV, Sharepoint etc. You should go through them and disable everything your site is not using. Please note that some Liferay builtin portlets rely on some of these APIs. All the APIs are accessible under /api URL.
Mixed HTTP and HTTPS
Everyone should by now know about Firesheep a firefox extension that allows an attacker to sniff a wifi network they are connected to and hijack a users authenticated session. This attack can compromise any website that doesn’t use all authenticated traffic over https. If you use https for just part of the site and your users can access rest of the site as authenticated user over http then your are vulnerable to Firesheep attack. This is especially bad with Liferay if you are using the default encryption and you use Remember me functionality because then the attacker could even compromise your password and use it login to any system where you use the same password. I’m sad to say that even Liferay.com is vulnerable to this attack.
Shared Secrets
Don’t forget to change any shared secrets. The auth.token.shared.secret has a default value that you want to change so that no-one can try to exploit it. This tip came from Jelmer who has found many vulnerabilities in Liferay. Another one you don’t want to overlook is auth.mac.shared.key which has default value of blank. That one is relevant if you auth.mac.allowset to true.
This is not an exhaustive list but this should make your Liferay installation much more secure than it is by default. For more tips on what to configure before going to production check out Liferay whitepapers. You should especially read the deployment checklist. If you can think of any other things that should be on this list comment them or tweet them to me @koivimik
Update: Added shared secret tip from Jelmer
- Objects
- Classes
- Threads
- Native data structures
- Native code
The memory consumption associated with each item varies across applications, runtime environments and platforms. So how do you calculate the total memory? Well, it’s not really all that easy to get accurate number because you have little control over the native part. The only parts you can really control is the amount of heap -Xmx, memory consumed by classes -XX:MaxPermSize and thread stack -Xss which controls the amount of memory each thread takes. Be careful when adjusting stack size as too low size will cause StackOverflow exceptions and your application won’t work correctly. So the formula is:
(-Xmx) + (-XX:MaxPermSize) + numberofthreads * (-Xss) + Other mem
The other mem part depends on how much native code is used like NIO, socket buffers, JNI etc. It’s anywhere from 5% of total jvm memory and up. So assume we have following JVM arguments and 100 threads
-Xmx1024m -XX:MaxPermSize=256m -Xss512k
That would mean that the jvm process would take at least: 1024m + 256m + 100*512k + (0.05 * 1330m) = 1396.5m.
I usually use a quick approximation rule of 1.5 * max heap to be the minimum amont of RAM a tomcat process will require. This can be higher if you have large application that requires you to increase MaxPermSize beyond 256m. If you use this to size how much memory your system will require remember that you need to leave memory for the OS and other applications running on the system otherwise you might end up using a lot of virtual memory that will affect your application performance negatively.